Mongolian Chicken Recipe hits that perfect balance of salty, sweet, garlicky, and a little sticky, and it cooks in about 30 minutes from start to finish, which makes it perfect for busy weeknights and hungry families. It works for anyone who loves takeout-style Chinese food but wants something a bit lighter and fresher at home. I tested this version so many times that my kids started calling it “the house chicken,” and honestly, I took that as a compliment.
Why Mongolian Chicken Recipe Is Worth It
This Mongolian Chicken Recipe tastes like your favorite takeout, but you control the sweetness, the spice, and the oil. The sauce clings to every piece of chicken, and the garlic-ginger flavor hits right away.
You also cook everything in one skillet, so cleanup stays easy. The recipe uses simple pantry ingredients, so you probably own half of them already.
“Tastes like restaurant Mongolian chicken but lighter, fresher, and somehow more addictive at home. ★★★★★”
Ingredients You Need
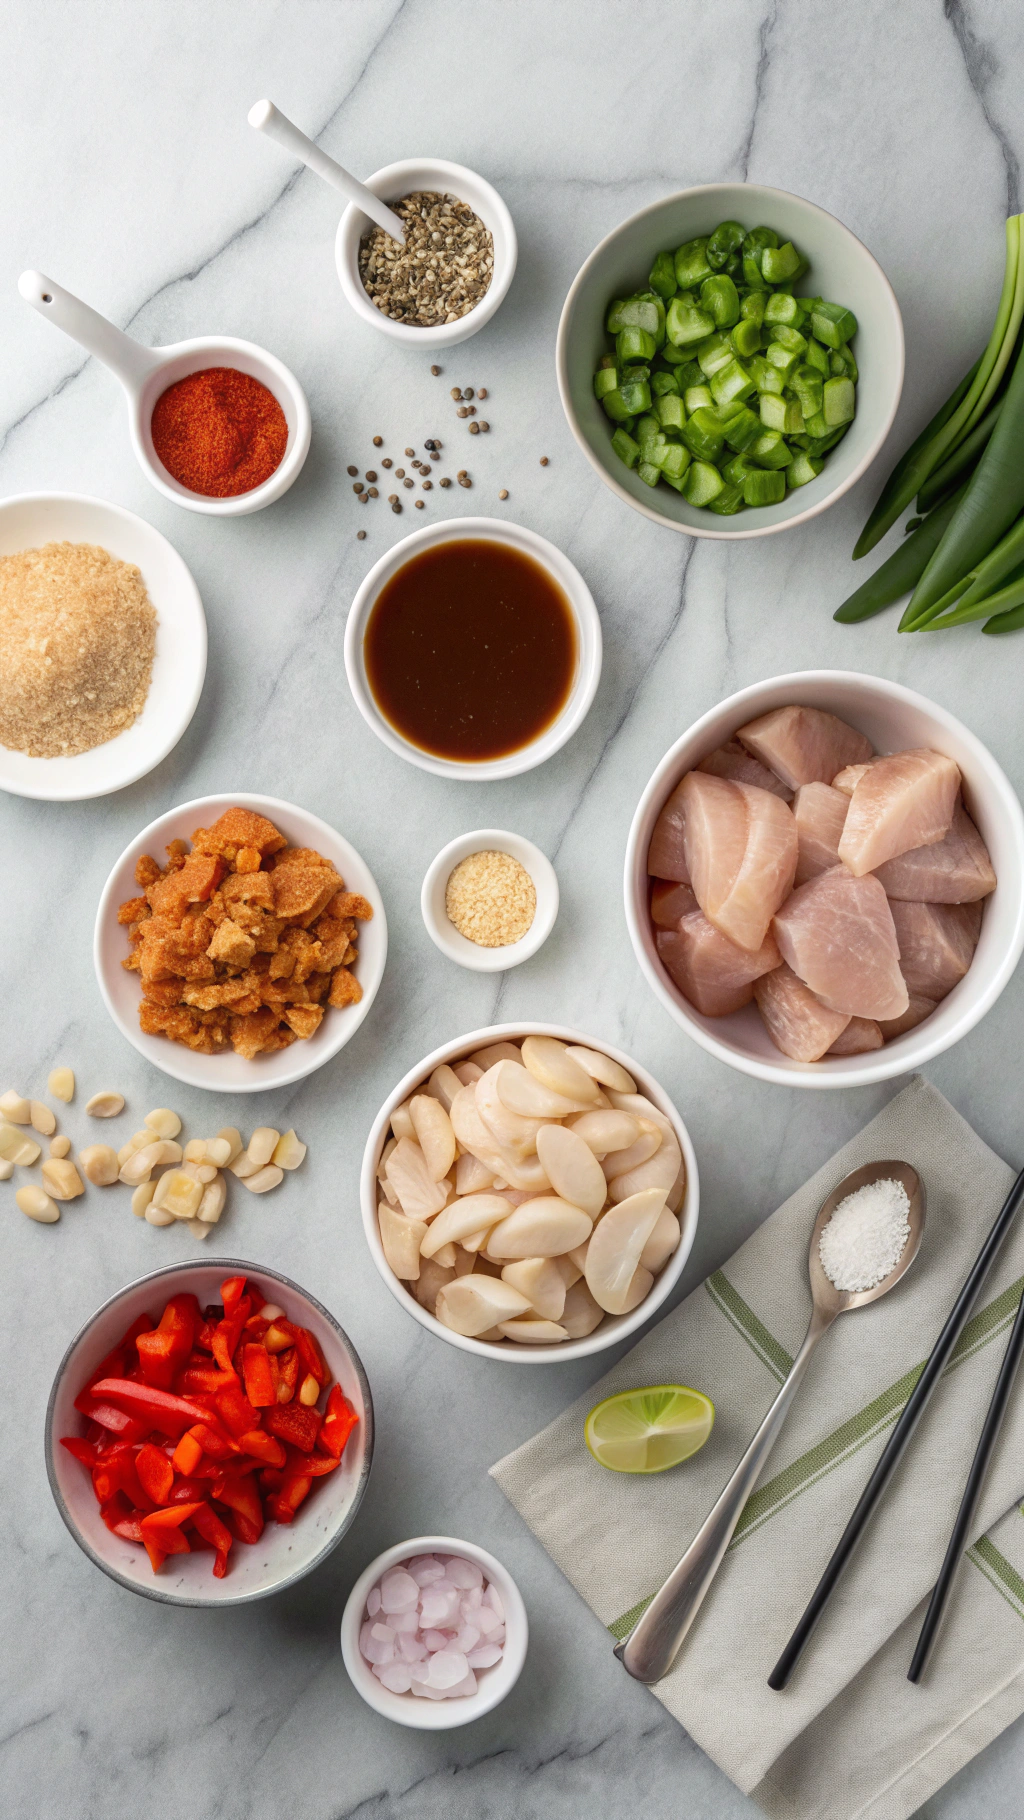
Chicken
- 1 ½ pounds boneless skinless chicken thighs, cut in bite-size strips
- Thighs stay juicy and forgiving, even if you cook them a minute too long.
- Optional: use boneless skinless chicken breast for a leaner Mongolian Chicken Recipe
- Slice thin against the grain so it stays tender.
Marinade and Coating
- 3 tablespoons cornstarch
- This gives the chicken a light crust and thickens the sauce.
- 1 tablespoon soy sauce
- 1 teaspoon neutral oil (canola, avocado, or grapeseed)
- Pinch of black pepper
You can swap cornstarch with potato starch or tapioca starch if you avoid corn. Use tamari instead of regular soy sauce for a gluten free version.
Sauce Ingredients
- ½ cup low sodium soy sauce
- I like Kikkoman low sodium or a similar brand for consistent flavor.
- ½ cup water or low sodium chicken broth
- ⅓ cup packed brown sugar
- 2 tablespoons hoisin sauce
- Adds body and a little tang; use gluten free hoisin if needed.
- 1 tablespoon rice vinegar
- 1 to 2 teaspoons toasted sesame oil
- ¼ to ½ teaspoon crushed red pepper flakes
- Adjust for your heat preference; kids in the house usually means ¼ teaspoon.
If you prefer less sugar, drop the brown sugar to ¼ cup and add 1 extra tablespoon hoisin. For a soy alternative, use coconut aminos and reduce the brown sugar to 2 tablespoons because coconut aminos taste sweeter.
Aromatics and Veggies
- 4 cloves garlic, minced
- 1 tablespoon fresh ginger, minced or grated
- Use a microplane for super fine ginger that melts into the sauce.
- 4 to 5 green onions, sliced on a bias
- Separate white and green parts; whites cook in the sauce, greens go on top.
- 1 small red bell pepper, thinly sliced (optional but tasty)
- 1 small yellow onion, thinly sliced (optional for extra sweetness)
You can use the pre-minced garlic and ginger from a jar if you feel tired on a weeknight. Fresh tastes brighter, but the jar versions still give solid flavor.
Oil and Garnishes
- 2 to 3 tablespoons neutral oil for cooking
- 1 tablespoon sesame seeds, toasted
- Extra sliced green onions for topping
Pantry Shortcuts
- Bottled stir fry sauce: use ¼ cup in place of hoisin plus 2 tablespoons soy sauce if that sits in your fridge.
- Pre-sliced stir fry veggie mix: toss in a couple of handfuls during the last few minutes of cooking.
- Microwave rice: perfect base for Mongolian Chicken Recipe when you feel short on time.
Equipment List
- Large nonstick skillet or wok
- Cutting board and sharp knife
- Small bowl for sauce
- Medium bowl for chicken and cornstarch
- Tongs or a spatula
- Measuring cups and spoons
Quick Tips & substitutions
- Slice chicken thin and evenly so it cooks fast and stays tender.
- Pat chicken dry before coating with cornstarch so the crust turns crisp instead of gummy.
- Use low sodium soy sauce so the Mongolian Chicken Recipe does not taste too salty.
- Swap chicken thighs with thinly sliced flank steak for a Mongolian beef style version.
- Use coconut aminos instead of soy sauce and reduce the brown sugar for a lower sodium option.
- Stir the sauce ingredients before you start cooking so you move quickly once the chicken hits the pan.
- Cook in batches if your pan feels crowded; crowded chicken steams instead of browning.
- Add more crushed red pepper or a drizzle of chili crisp at the end if you like extra heat.
- Toss in broccoli florets or snap peas during the last 3 to 4 minutes for a full one pan meal.
- Serve over cauliflower rice or shredded cabbage if you want a lower carb Mongolian Chicken Recipe.
How to Make Mongolian Chicken
1: Prep the chicken
Place the sliced chicken in a medium bowl. Add soy sauce, oil, and black pepper, then toss to coat every piece. Sprinkle cornstarch over the chicken and toss again until the pieces look evenly coated and no dry pockets of starch remain.
Let the chicken sit for 10 to 15 minutes while you prep the sauce and aromatics. This short rest helps the coating stick and gives the chicken better texture.
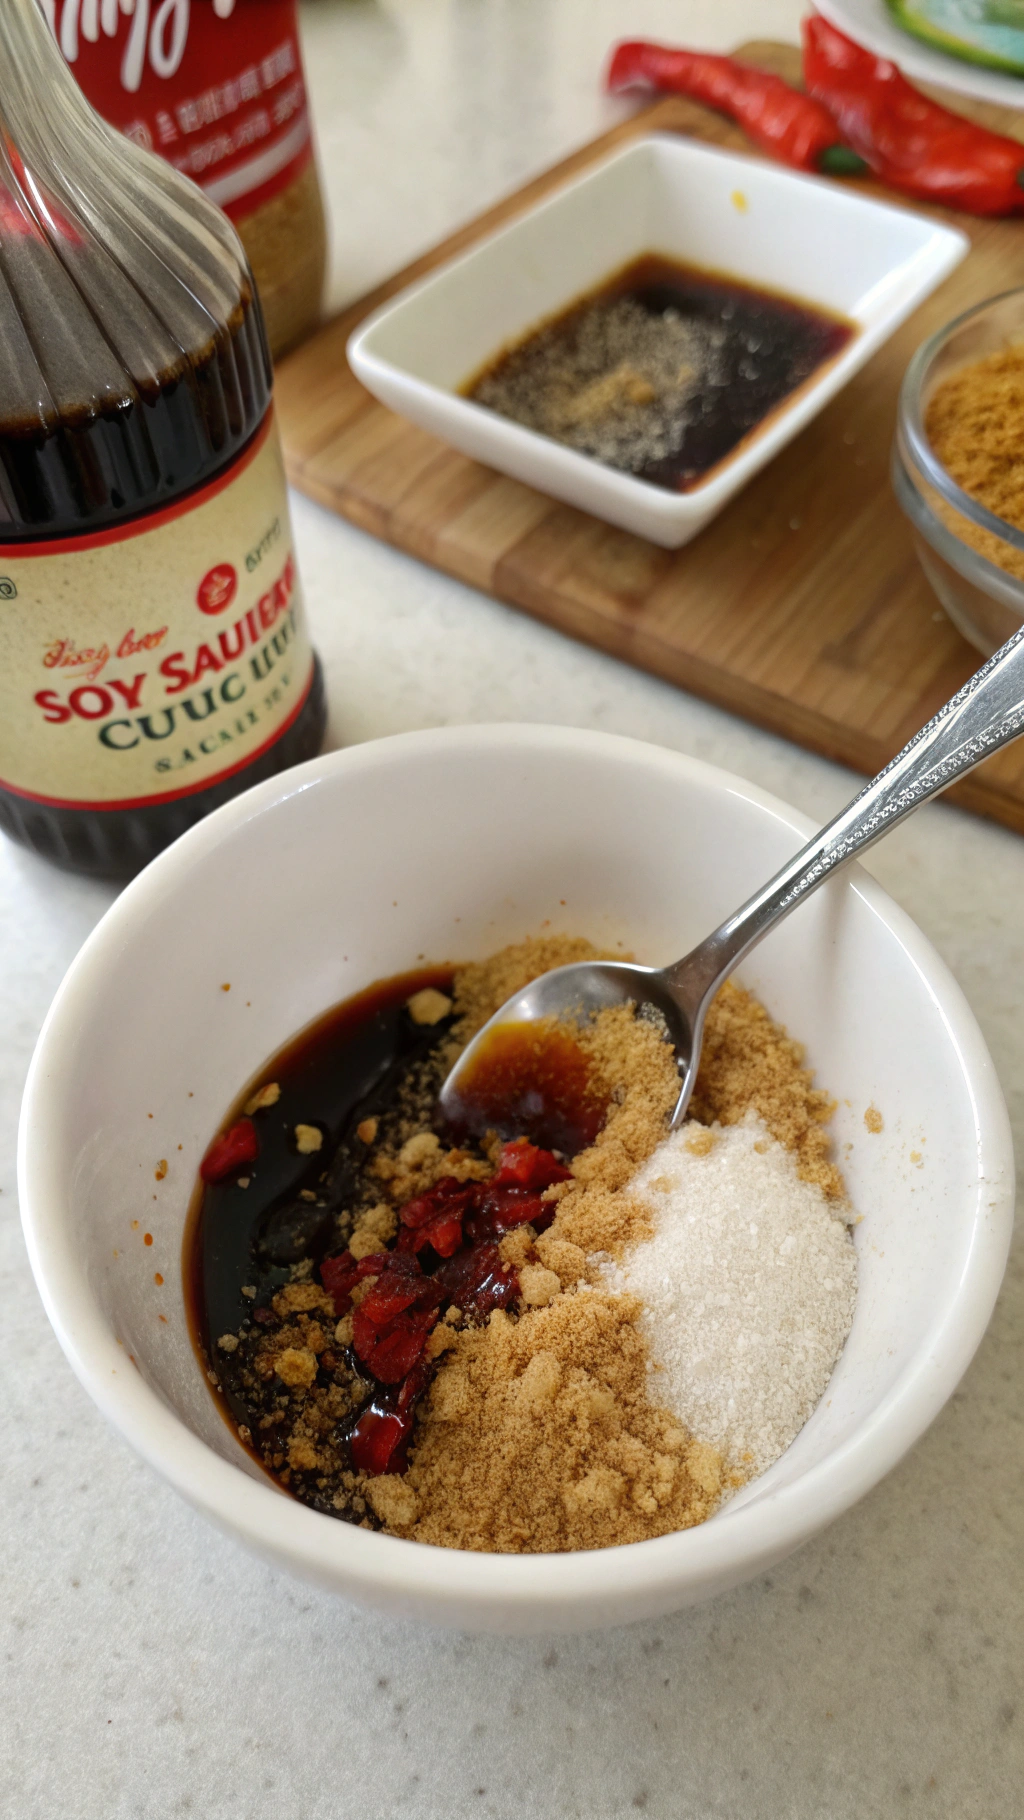
2: Mix the sauce
In a small bowl, whisk together soy sauce, water or broth, brown sugar, hoisin sauce, rice vinegar, sesame oil, and crushed red pepper flakes. Whisk until the sugar dissolves and the sauce looks smooth. Taste a tiny bit and adjust with more sugar for sweetness or more vinegar for brightness.
Set the sauce near the stove so you can grab it quickly. Once the chicken browns, things move fast.
3: Prep aromatics and veggies
Mince the garlic and ginger and slice the green onions, keeping white and green parts separate. Slice the bell pepper and onion, if you use them. Keep everything on a plate or small tray so you can toss ingredients in without scrambling.
I treat this step like my own little cooking show setup, minus the camera crew. It keeps the Mongolian Chicken Recipe process smooth and stress free.
4: Brown the chicken
Heat 2 tablespoons oil in a large skillet or wok over medium high heat. When the oil shimmers, add half the chicken in a single layer. Let it cook without stirring for 2 to 3 minutes so it develops a light crust, then flip and cook another 2 to 3 minutes until the pieces look browned and cooked through.
Transfer the chicken to a plate and repeat with the remaining chicken, adding a bit more oil if the pan looks dry. This step gives you that restaurant style texture.
5: Sauté veggies and aromatics
Lower the heat to medium and add a small splash of oil if needed. Add the sliced onion and bell pepper and cook for 3 to 4 minutes until they soften but still keep some bite. Stir in garlic, ginger, and the white parts of the green onions.
Cook for 1 to 2 minutes until the garlic and ginger smell fragrant. Stir often so the aromatics do not burn.
6: Add the sauce
Give the sauce a quick stir, then pour it into the skillet with the veggies. Stir and scrape up any browned bits from the bottom of the pan because those bits hold a lot of flavor. Bring the sauce to a gentle simmer over medium heat.
Let the sauce bubble for 2 to 3 minutes so it thickens slightly. The cornstarch from the chicken will help it turn glossy and clingy.
7: Combine chicken and sauce
Add the browned chicken and any juices from the plate back into the skillet. Toss everything so the sauce coats every piece of chicken and veggie. Cook for another 2 to 3 minutes until the sauce thickens and the chicken feels hot all the way through.
Taste and adjust seasoning. Add a splash of water if the sauce looks too thick or a pinch of brown sugar if you want more sweetness.
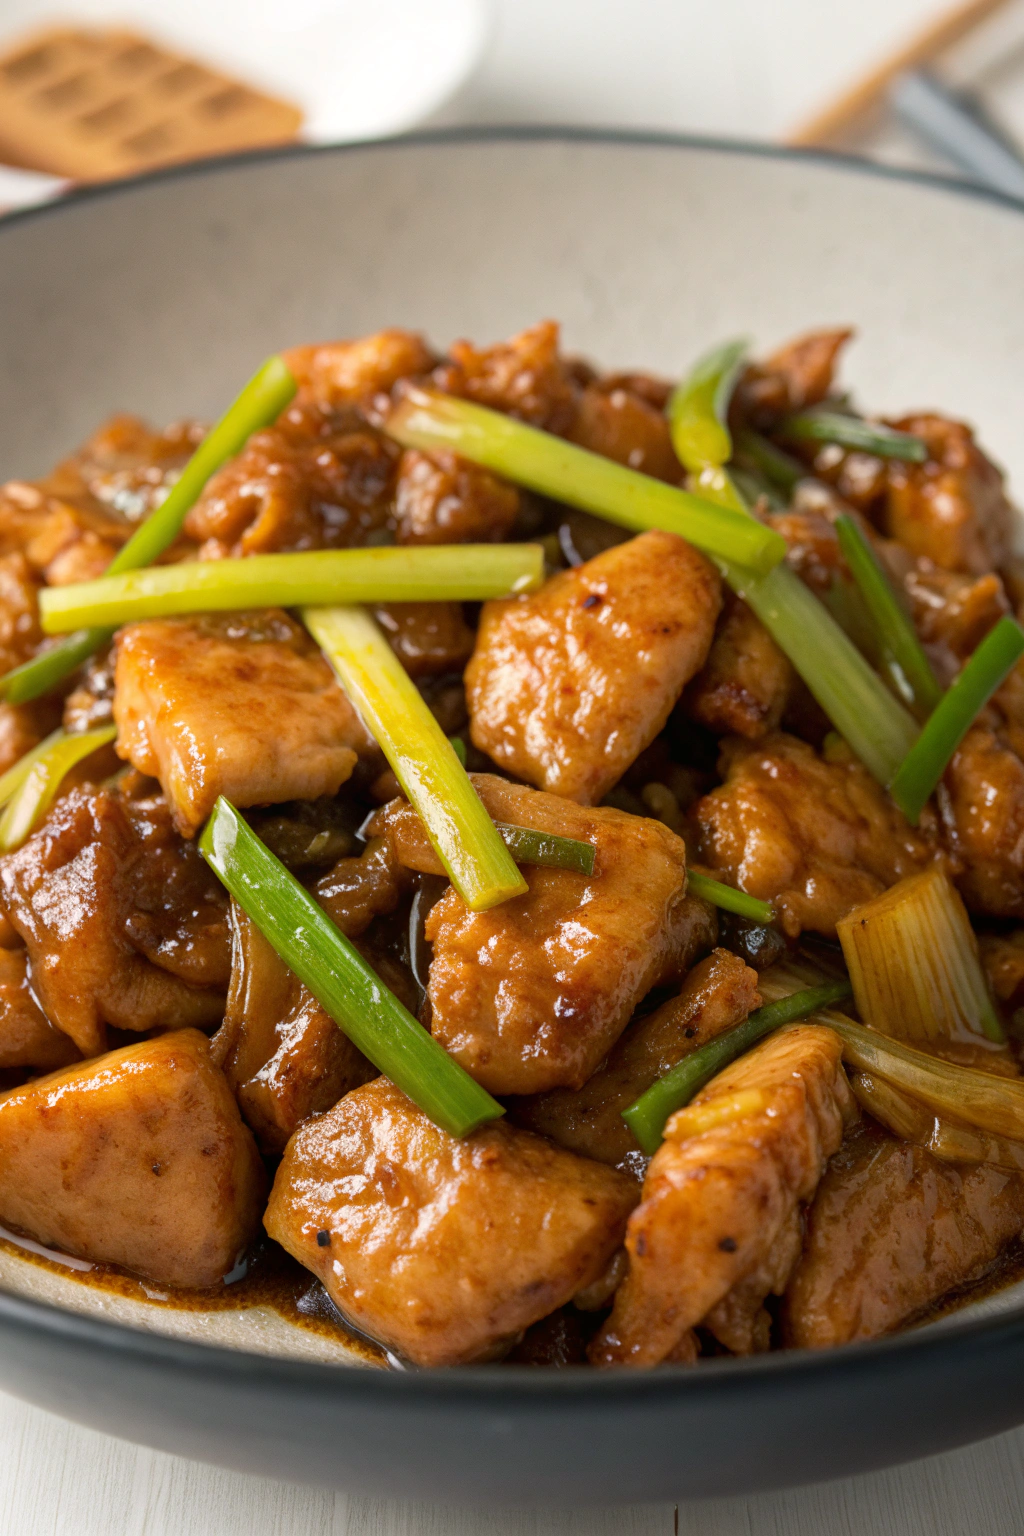
8: Finish and garnish
Turn off the heat and stir in the green parts of the green onions. Sprinkle sesame seeds over the top. Give everything a final toss.
Serve the Mongolian Chicken Recipe over rice, noodles, or veggies while it stays hot and glossy. The sauce thickens more as it cools, so enjoy it fresh for peak texture.
Recipe Variations
- Gluten free: use tamari or certified gluten free soy sauce and gluten free hoisin; check labels on broth.
- Lower sugar: cut brown sugar to 2 tablespoons and add extra 1 tablespoon rice vinegar for balance.
- Extra veggie: add broccoli, snow peas, mushrooms, or zucchini during the sauté step.
- Spicy version: add 1 teaspoon chili garlic sauce or sriracha to the sauce mix.
- No soy: use coconut aminos plus a pinch of salt and reduce brown sugar to 1 tablespoon.
- Air fryer twist: air fry the cornstarch coated chicken at 400°F for 10 to 12 minutes, then toss in the stovetop sauce.
- Vegan: swap chicken with extra firm tofu or tempeh, press it dry, coat with cornstarch, and pan fry until crisp.
Ways to Serve Mongolian Chicken
- Spoon over steamed jasmine rice or brown rice.
- Serve with stir fried vegetables like broccoli, carrots, and snap peas.
- Pair with simple egg fried rice or vegetable fried rice.
- Serve over rice noodles or lo mein style noodles for a takeout style bowl.
- Use as a filling for lettuce wraps with shredded carrots and cucumber.
- Top a bowl of cauliflower rice with Mongolian Chicken Recipe for a lighter option.
Storage Success
Let the Mongolian Chicken Recipe cool to room temperature, then store it in an airtight container in the fridge for up to 4 days. The sauce thickens in the fridge, so add a splash of water or broth when you reheat it in a skillet over medium heat. Stir often while it reheats so the chicken warms evenly and the sauce turns silky again.
You can freeze leftovers for up to 2 months in a freezer safe container. Thaw overnight in the fridge, then reheat on the stove with a bit of water until hot and bubbly. The flavor actually deepens a little after a day, so next day lunch tastes pretty fantastic.
Mongolian Chicken Recipe
Ingredients
Instructions
- Pat the chicken strips dry with paper towels. In a bowl, toss the chicken with cornstarch, salt, and black pepper until evenly coated.
- Heat 2 tablespoons of vegetable oil in a large skillet or wok over medium-high heat. Add the chicken in a single layer, cooking in batches if needed to avoid overcrowding.
- Cook the chicken for 6–8 minutes, turning occasionally, until golden brown and cooked through. Transfer cooked chicken to a plate and set aside.
- In a small bowl, whisk together soy sauce, water, brown sugar, hoisin sauce (if using), garlic, ginger, rice vinegar, sesame oil, and cornstarch until smooth.
- Add the remaining 1 tablespoon of vegetable oil to the same skillet over medium heat. Pour in the sauce mixture, stirring constantly.
- Cook the sauce for 2–3 minutes until it comes to a simmer and thickens to a glossy consistency.
- Return the cooked chicken and any accumulated juices to the skillet, tossing to coat evenly in the sauce.
- Cook for another 2–3 minutes, allowing the chicken to absorb the flavors and the sauce to cling to the pieces.
- Serve the Mongolian Chicken hot over cooked rice, garnished with sliced green onions and toasted sesame seeds if desired.
Notes
Approximate per serving (1/4 of recipe, without rice): 310 calories; fat 15 g; saturated fat 3 g; carbohydrates 18 g; fiber 0 g; sugars 11 g; protein 26 g; sodium 920 mg. Values are estimates and will vary based on exact ingredients, brands, and portion size.