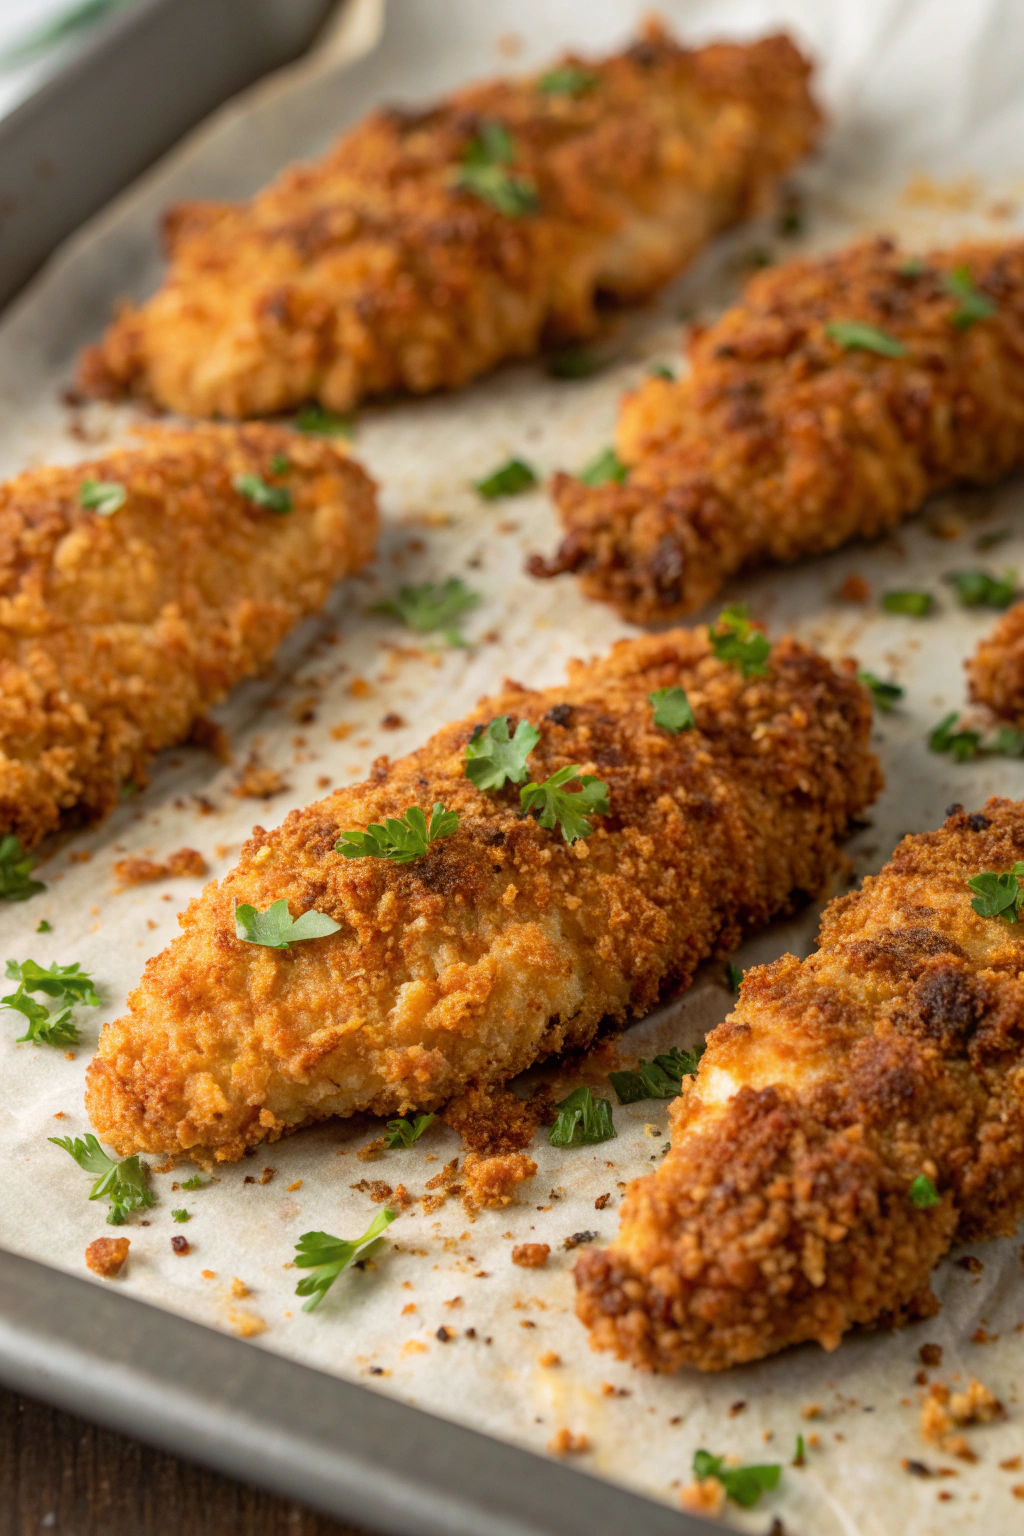
Crispy Homemade Baked Chicken Tenders Recipe tastes like your favorite drive-thru order, only hotter, crunchier, and way more satisfying. This version keeps things budget-friendly with simple pantry ingredients and bakes in about 25 minutes, so you get dinner on the table in under 45 minutes total. I tested this on my own picky family, and they now request these baked chicken tenders more than pizza night, which says a lot.
Reasons To Try This Crispy Homemade Baked Chicken Tenders Recipe
These baked chicken tenders turn out golden, crunchy, and juicy without deep frying or fancy equipment. The coating hugs the chicken, stays crisp, and gives you that satisfying crunch with every bite.
You control the ingredients, so you skip mystery oils and extra additives from frozen boxes. The recipe uses budget-friendly chicken and pantry staples, so it works for weeknights, game day, or a kid-approved dinner that adults secretly love too.
“These Crispy Homemade Baked Chicken Tenders taste better than any restaurant version and stay juicy every single time, no leftovers needed. ★★★★★”
Ingredients You Need
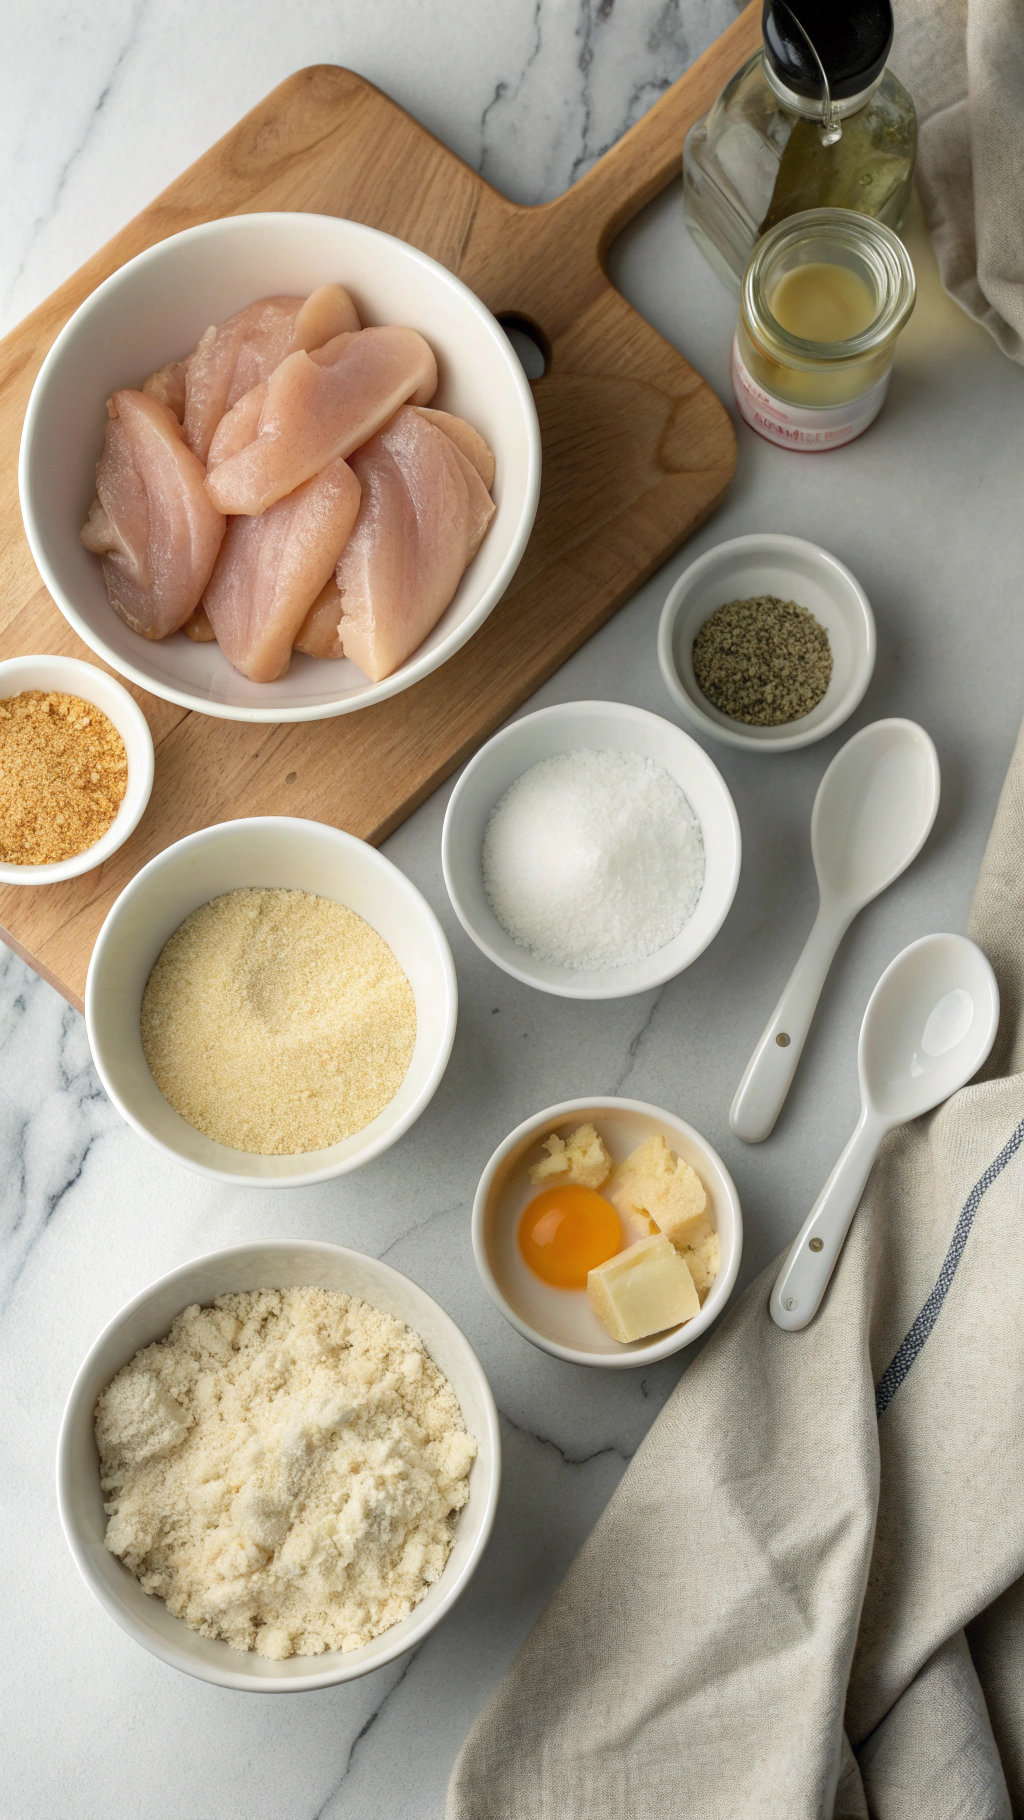
Chicken
- 1.5 pounds chicken tenders
Wet mixture
- 2 large eggs
- 2 tablespoons milk or half-and-half
- 1 teaspoon hot sauce, optional
- Any mild hot sauce works and adds flavor more than heat.
- 1 teaspoon Dijon or yellow mustard
- Store brands work fine and keep costs low.
Dry coating
- 1 cup plain breadcrumbs
- Use panko breadcrumbs for extra crunch.
- 1 cup crushed cornflakes or crispy rice cereal
- This combo gives serious crunch without frying.
- 1 teaspoon kosher salt
- 1 teaspoon garlic powder
- 1 teaspoon onion powder
- 1 teaspoon smoked paprika or sweet paprika
- 1 teaspoon dried Italian seasoning or dried parsley
- 1/2 teaspoon black pepper
- 1/4 teaspoon cayenne pepper, optional for heat
- 3 tablespoons grated Parmesan cheese
- Use shelf-stable grated Parmesan if you want a pantry shortcut.
Extra for coating and baking
- 1/4 cup all-purpose flour
- Use a gluten-free all-purpose blend if you need a gluten-free version.
- 2 to 3 tablespoons neutral oil
Dipping sauce ideas
Equipment
- Large baking sheet
- Wire rack that fits inside the baking sheet
- This helps air circulate so the tenders crisp on all sides.
- Parchment paper or foil for easier cleanup
- Three shallow bowls for flour, egg mixture, and breadcrumb mixture
- Tongs for easy coating and flipping
- Instant-read thermometer for perfect doneness
Tips
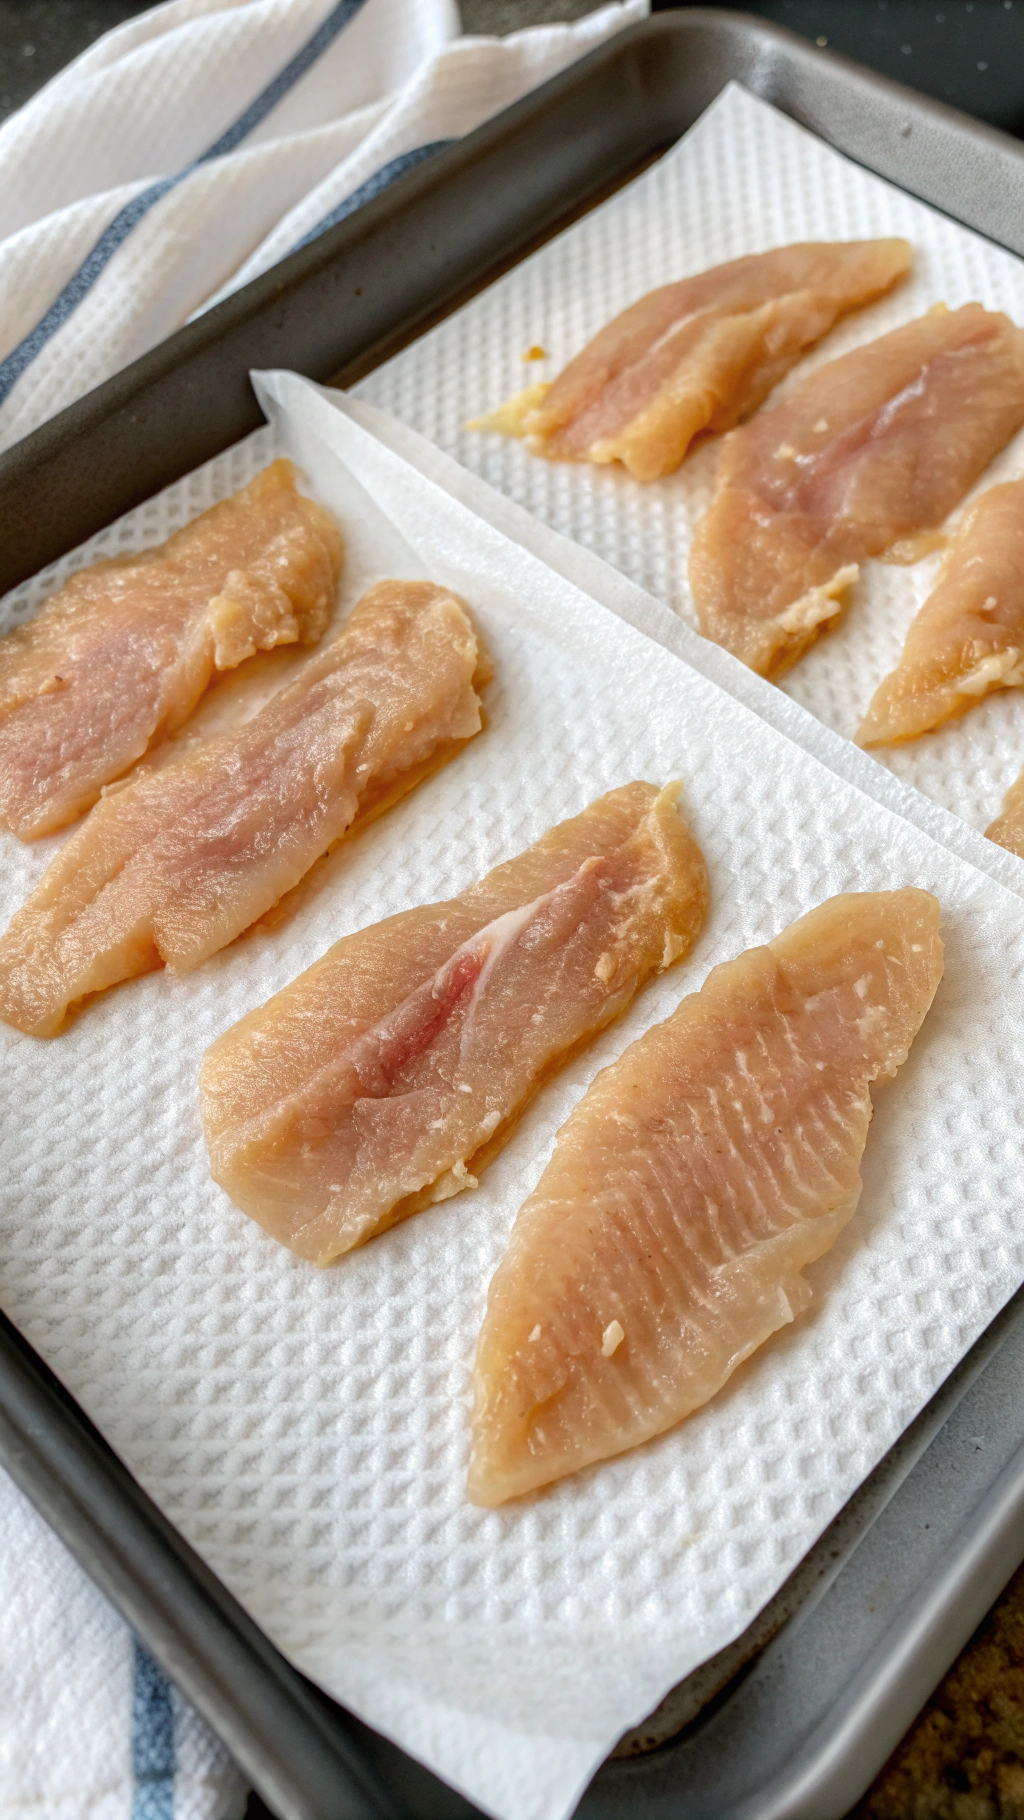
- Pat the chicken dry before coating so the breading sticks better.
- Line the pan and use a wire rack so the tenders crisp on all sides.
- Preheat the oven fully before you bake, so the coating starts crisping right away.
- Spray or drizzle the breaded tenders lightly with oil for a crunchy finish.
- Do not crowd the pan, or the tenders steam instead of crisp.
- Season every layer: flour, egg mixture, and breadcrumb mix.
- Use panko plus crushed cornflakes for the crunchiest texture.
- Bake a test tender first if you want to adjust salt or spice levels.
- Let the tenders rest 3 to 5 minutes after baking so the juices settle.
- Serve with at least two dipping sauces so everyone finds a favorite.
How to Make Crispy Homemade Baked Chicken Tenders
1: Prep the pan and oven
Preheat your oven to 425°F. Line a large baking sheet with parchment or foil, then set a wire rack on top and lightly oil or spray the rack. This setup keeps the tenders lifted so hot air circulates and crisps every side.
2: Prep the chicken
Pat the chicken tenders dry with paper towels. Trim any visible fat or tendon pieces. If you use chicken breasts, slice them into strips about 1 inch wide so they cook evenly and match classic chicken tender size.
3: Set up the breading station
Place the flour in one shallow bowl and season it with a pinch of salt and pepper. In a second bowl, whisk together eggs, milk, mustard, and hot sauce until smooth. In a third bowl, mix breadcrumbs, crushed cornflakes, Parmesan, salt, garlic powder, onion powder, paprika, Italian seasoning, black pepper, and cayenne.
4: Coat the chicken
Work with one piece of chicken at a time. Dredge the chicken in the flour and shake off any excess. Dip it into the egg mixture and let the extra drip off, then press it into the breadcrumb mixture so every side gets a thick, even coating.
5: Arrange on the rack
Place each coated chicken tender on the prepared wire rack. Leave a little space between each piece so heat can circulate. Lightly drizzle or spray the tops with oil, which helps the coating turn golden and crisp.
6: Bake until golden and cooked through
Bake the chicken tenders for 15 to 18 minutes, depending on thickness. Flip them halfway through baking and give them another light spray of oil. Check with an instant-read thermometer and pull them when the thickest piece reaches 165°F.
7: Rest
Let the baked chicken tenders rest on the rack for 3 to 5 minutes. This short rest keeps the coating crisp while the juices settle inside the meat. Serve hot with your favorite dipping sauces and sides.
Different Ways to Try It
- Gluten-free: Use gluten-free panko or crushed gluten-free cereal and a gluten-free flour blend.
- Lower carb: Use crushed pork rinds and grated Parmesan instead of breadcrumbs and cereal.
- Dairy-free: Skip the Parmesan and use a dairy-free milk in the egg mixture.
- Extra spicy: Add more cayenne and hot sauce, and serve with spicy sriracha mayo.
- Kid-friendly mild: Skip cayenne and hot sauce and use sweet paprika only.
- Herb-forward: Add extra dried parsley, basil, or oregano to the breadcrumb mix.
- Extra crunchy: Double-coat by dipping in egg and crumbs twice for a thicker crust.
How to Serve Baked Chicken Tenders
Serve these crispy homemade baked chicken tenders hot with a trio of dips like ketchup, honey mustard, and ranch. Add a simple side salad, roasted veggies, or steamed green beans for balance. Kids love them with sweet potato fries or baked potato wedges. For a fun twist, tuck the tenders into warm tortillas with lettuce and sauce for quick chicken tender tacos.
Make-Ahead and Storage Success
Cool leftover baked chicken tenders completely before you store them. Place them in an airtight container and keep them in the fridge for up to 3 days. Reheat them in a 375°F oven or air fryer until hot and crisp again, about 8 to 10 minutes. Freeze cooked tenders on a baking sheet until firm, then store them in a freezer bag for up to 2 months and reheat from frozen until they heat through and crisp.
Ingredients
Instructions
- Preheat the oven to 425°F (220°C). Line a large baking sheet with parchment paper and lightly coat with nonstick cooking spray.
- Pat the chicken tenders dry with paper towels to help the coating stick better.
- In a shallow bowl, whisk together the flour, salt, black pepper, paprika, and garlic powder.
- In a second shallow bowl, beat the eggs with the milk until well combined.
- In a third shallow bowl, combine the panko breadcrumbs, grated Parmesan cheese, and olive oil, tossing until the crumbs are lightly coated and evenly moistened.
- Working one piece at a time, dredge each chicken strip in the seasoned flour, shaking off any excess.
- Dip the floured chicken into the egg mixture, letting any excess drip back into the bowl.
- Press the chicken into the panko-Parmesan mixture, coating all sides and pressing firmly so the crumbs adhere well.
- Arrange the breaded chicken tenders in a single layer on the prepared baking sheet, leaving a little space between each piece. Lightly spray the tops with nonstick cooking spray for extra crispiness.
- Bake for 10 minutes, then carefully flip each tender and bake for another 8–10 minutes, or until the coating is golden brown and the chicken is cooked through (internal temperature should reach 165°F/74°C).
- Remove from the oven and let rest for 3–5 minutes to help the coating set. Serve warm with your favorite dipping sauces.
Notes
Approximate per serving (1/4 of recipe): 380 calories; fat 13 g; saturated fat 4 g; carbohydrates 30 g; fiber 1 g; sugars 2 g; protein 34 g; sodium 780 mg. Values will vary based on specific ingredient brands and portion sizes.